How to Set Up a Router's Port Forwarding for a Nintendo Switch Console
Instructions on forwarding network ports to a Nintendo Switch console.
Important:
- While Nintendo provides this information for our consumers' use, it is up to each consumer to determine what security needs they have for their own networks, and to decide how best to configure their network settings to meet those needs.
- The following steps are general steps that apply to most routers. If you need specific instructions for your router, please contact the manufacturer of the router for further assistance.
Complete These Steps:
Perform the following steps to assign a static IP address to your Nintendo Switch console.
On a PC or smart device
- Using a device on your network (PC, laptop, smart device, etc.), locate the following network information:
- IP Address
- Subnet Mask
- Gateway
On the Nintendo Switch console
- From the Advanced Settings page of your network connection's settings, select IP Address Settings.
- Select Manual.
- Select IP Address, then hold down the B Button to delete the existing IP address (it defaults to zeros).
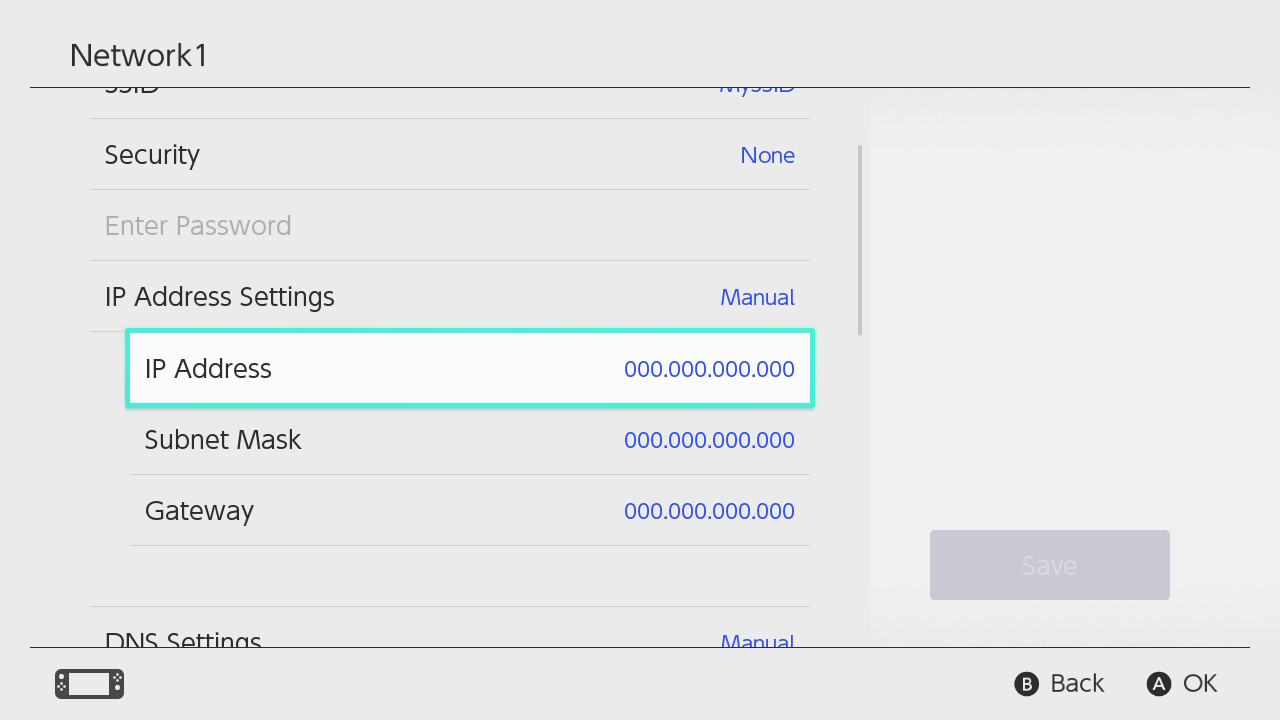
- Enter the IP address you found on the network device, but add 20 to the last section of digits, and then select OK.
- As an example, if your computer's IP address display as 192.168.2.5, enter 192.168.2.25 on the Nintendo Switch.
Important:
Every device on a network must have a different, unique IP address. If the connection test fails with the IP address that you entered, try a different IP address by adding 30, 40, and so on to the last section of digits.
- As an example, if your computer's IP address display as 192.168.2.5, enter 192.168.2.25 on the Nintendo Switch.
- Select Subnet Mask, then hold down the B Button to delete the existing subnet mask.
- Enter in the subnet mask as it appears in your network settings, and then select OK.
- For most networks, the subnet mask is 255.255.255.000.
- Select Gateway, then hold down the B Button to delete the existing gateway.
- Enter in the default gateway as it appears in your network settings, and then select OK.
On a PC or smart device
- Access your router's settings.
- Locate the Port Forwarding settings. While the location will vary from router to router, it will typically be located in an area titled firewall, virtual server, security, or applications and gaming.
- When asked for an application name, you can enter any word (Nintendo Switch, etc.)
- Within the port range, enter the starting port and the ending port to forward. For the Nintendo Switch console, this is port 1024 through 65535.
- Set the protocol as UDP.
- Enter the IP address you assigned to the console.
- Check Enable or Apply to turn on this rule.
- Save the changes to the router.