Connecting using WPS
Support | New Nintendo 2DS XL, New Nintendo 3DS, New Nintendo 3DS XL, Nintendo 2DS, Nintendo 3DS, Nintendo 3DS XL
Setting up a connection can be simple using WPS. Refer to the instruction manual of your access point for further information.
Follow the steps described in the step-by-step description above and tap Manual Setup. Then follow the steps below.
1. Touch the Wi-Fi PROTECTED SETUP button.

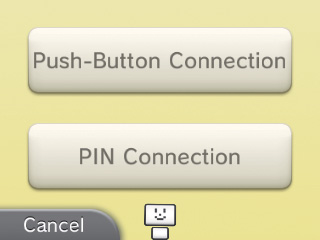
2. Touch the connection method supported by your access point.
3. Steps for the access point.
Note: It may take around 2 minutes to complete setup.
- For Push-Button Connection
Press and hold the WPS button on the access point until the LED blinks.

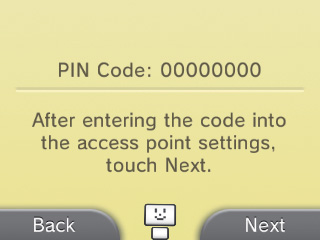
- For PIN Connection
A PIN will be displayed on the Touch Screen. Enter the code into the access point settings, then touch NEXT. After configuring the access point, touch NEXT on the Touch Screen of your Nintendo 3DS system.
4. Once the Setup Complete Screen appears, touch OK to begin a connection test.
- If the test is successful, setup is complete.
- Failure to establish a connection can sometimes occur after WPS setup is complete. If this happens, please wait a short while before trying to reconnect.